
Pixie CRM guided video tutorial
Detailed product walkthrough
Recorded live · 40:45 · English captions
Watch the detailed product walkthrough
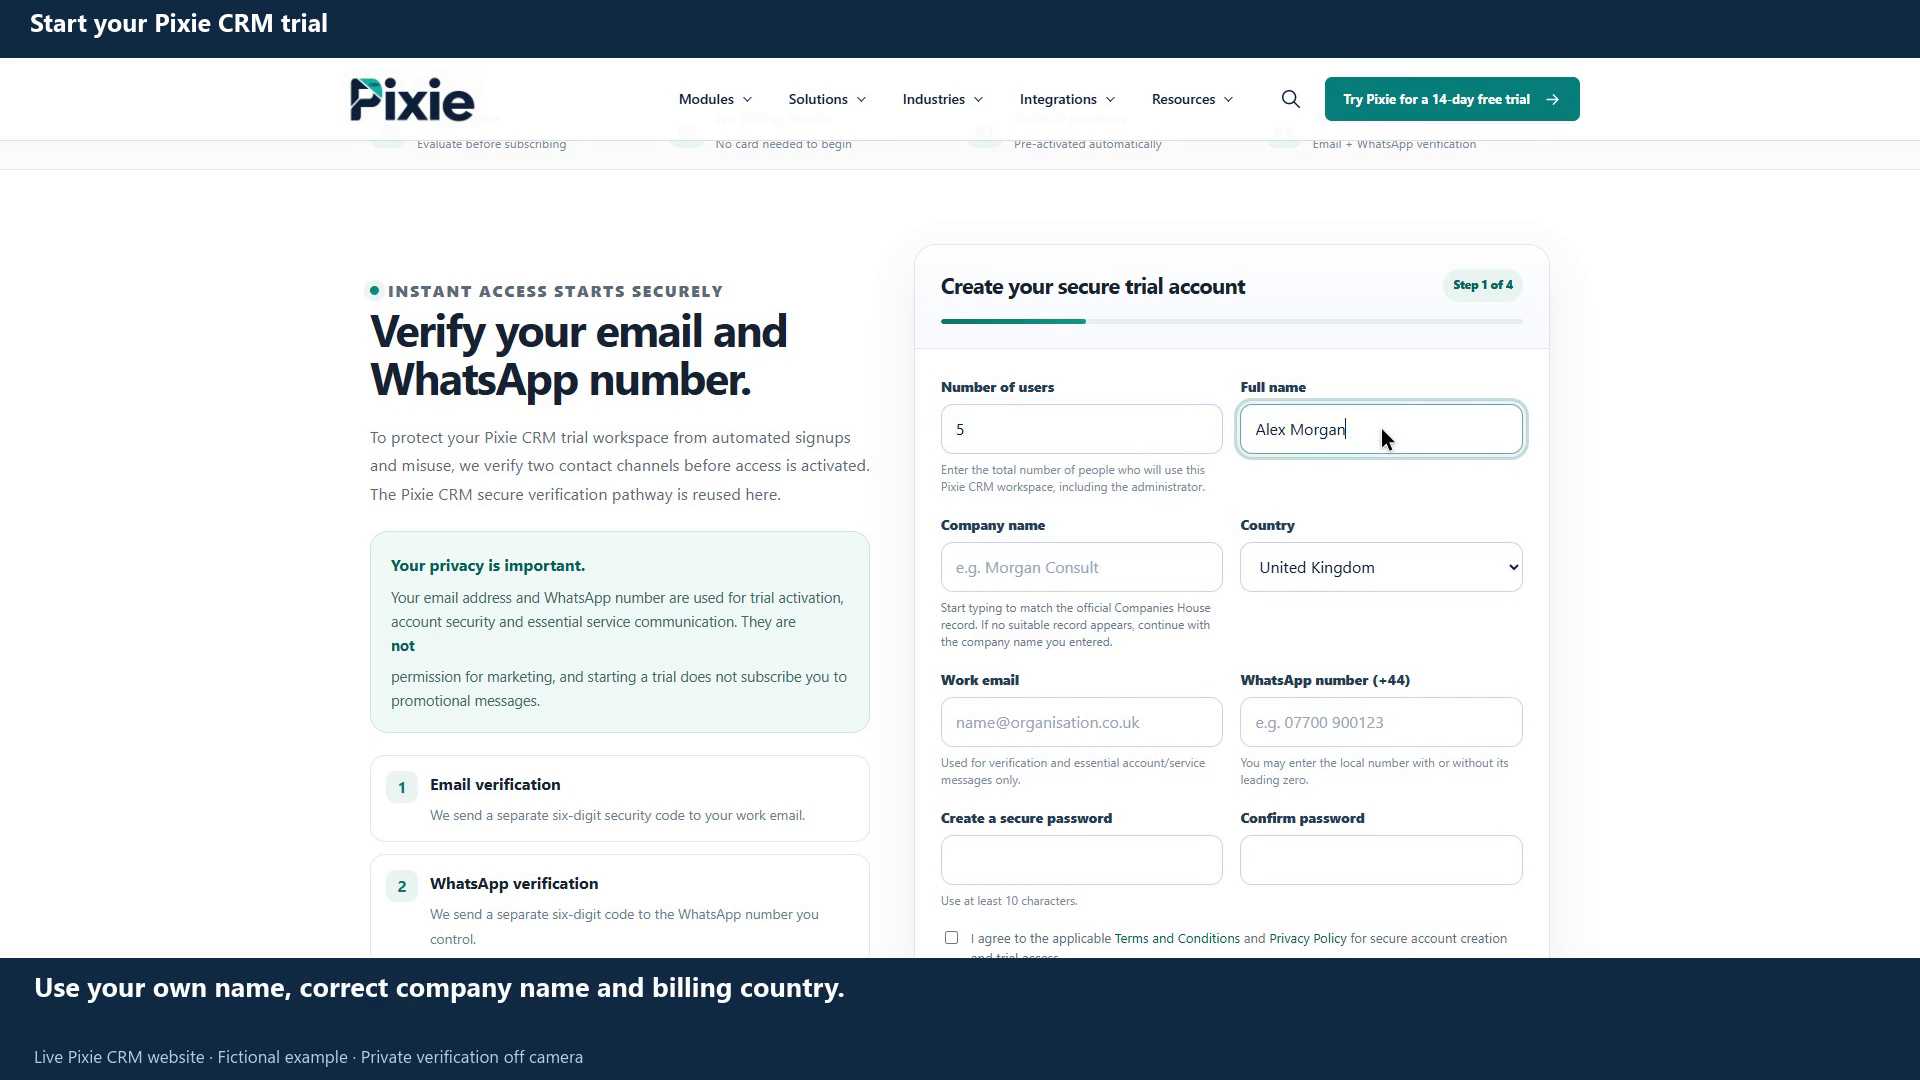 Start your Pixie CRM trial
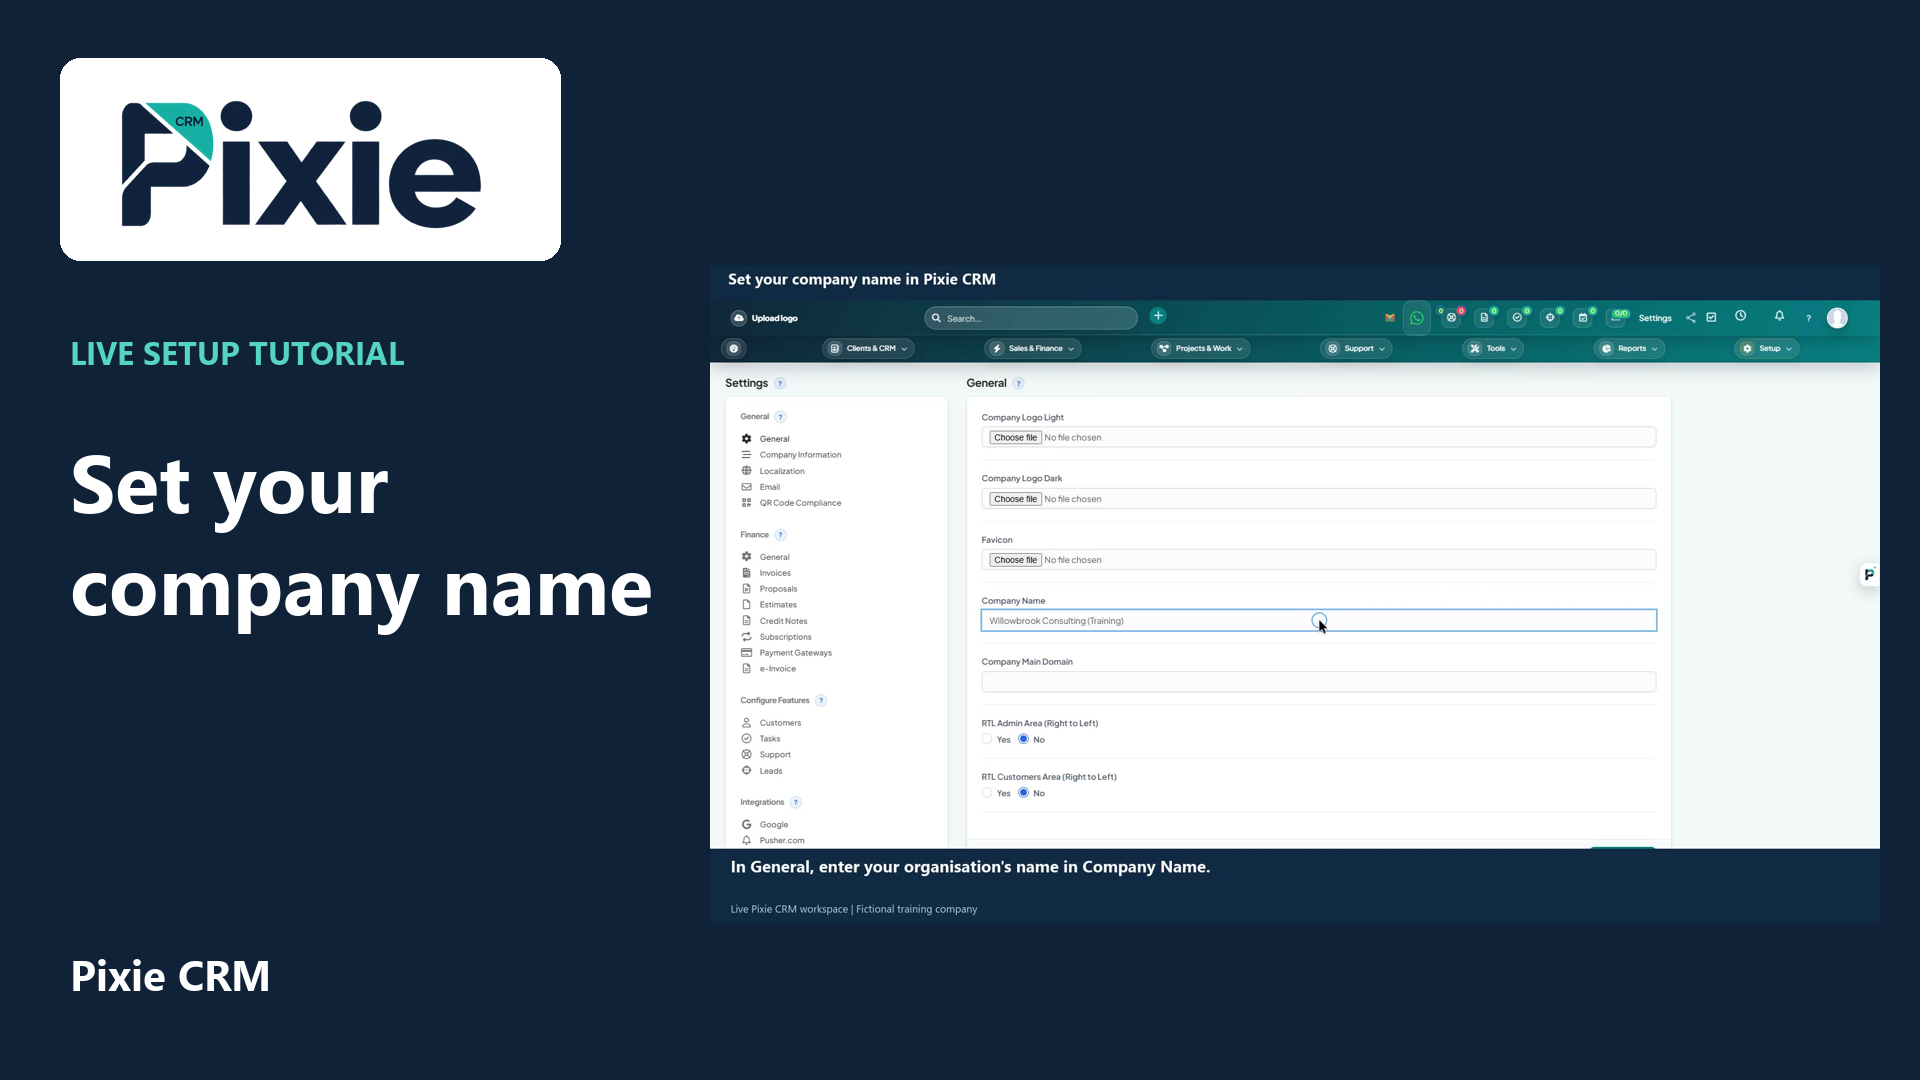 Set your company name in Pixie CRM
More videos in this category · Read the matching instructions
Follow a detailed Pixie CRM walkthrough with actual application screens, live clicks and clear instructions. Start with trial registration guidance and company setup, then work through customers, leads, projects and tasks before exploring the wider business tools.
Matching written guide · Download MP4 · English captions
All people, companies and work records are fictional training examples. Registration passwords, verification and external-provider authentication are explained as private steps. Provider connections, real calls, messages, payments and binding agreements are not completed in this demonstration. The wider module sections introduce available controls; dedicated feature tutorials provide their detailed workflows. Network identifiers are hidden in the audit-trail footage.
Watch this tutorial on YouTube ↗ · Related Pixie CRM tutorials ↗
Video chapters
- 0:00 — Pixie CRM: detailed product walkthrough
- 0:40 — Start your Pixie CRM trial
- 3:15 — Set your company name in Pixie CRM
- 4:26 — Company information for invoices and documents
- 6:24 — Set your date, time zone and language
- 8:16 — Configure a currency and make it the base currency
- 10:03 — Create a customer record
- 12:07 — Set customer billing and shipping addresses
- 13:29 — Add and review a customer note
- 14:34 — Create and verify a lead status
- 15:40 — Create and verify a lead source
- 16:43 — Create and assign a lead
- 18:58 — Upload and verify your company logo
- 20:14 — Manage leads in the Kanban pipeline
- 22:00 — Sales and finance module overview
- 25:33 — Create a customer project
- 27:37 — Create and assign a project task
- 29:28 — Create a project milestone
- 30:58 — Assign a task to a project milestone
- 32:06 — Appointments and communications overview
- 35:04 — Operational tools and reporting overview
- 37:45 — Integrations and administration overview
- 40:25 — Continue with related Pixie CRM tutorials
Read the video transcript
Welcome to Pixie CRM. Bring customer relationships, sales documents, project delivery, communications and reporting together in one workspace. This detailed walkthrough uses the actual application, with live clicks and clear instructions you can follow.
We will start with the trial registration guide, then configure the company and work through customers, leads, projects and tasks. Finally, explore the wider business tools. Use the chapters to find a topic, and complete passwords, verification and provider sign-in privately.
Pixie CRM connects customer records, sales, projects, finance and support. In this guide, we will follow the live trial registration form and explain the private verification steps that follow. The example details are fictional and will not be submitted.
Choose the free fourteen-day trial. Review the information on this page before you begin. The trial uses the administrator-configured default modules. Optional and industry-specific modules depend on your agreed configuration.
Select Start my free trial to reach the registration form. First, enter the total number of people who will use this workspace, including its administrator. In this example, the team has five users.
Enter your full name and company name. Use accurate business details when creating your own account. Check the selected country carefully, because it controls the relevant phone format and regional information. We are using a clearly identified training company.
Provide a work email address and a WhatsApp number that you control. Pixie sends separate verification codes to these two contact channels. The demonstration contact details shown here are examples only; they are not used to request codes or create an account.
Create and confirm your secure password privately. Read the terms and privacy information, and continue only if you agree. Use Send my verification codes when your own details are ready. Enter both codes privately and follow any approval or security instructions shown for your account.
After the required verification and approval steps, Pixie prepares your workspace and applies its configured default modules. Follow the readiness status on your own screen. When the workspace is ready, use My Account or choose Open Workspace. The dedicated workspace walkthrough continues from that point.
Use the matching Pixie CRM guide in this video's description for the written account instructions. Continue with the related setup tutorials when your workspace is ready. Available options depend on your plan, enabled modules and permissions.
Start on the Pixie CRM dashboard. Use Settings in the top bar to open your organisation's configuration. This guide shows how to set the company name for your own workspace. You need access to the relevant settings.
In General, find Company Name. Enter the name your organisation wants to display. We are using Willowbrook Consulting, a fictional training business. Review the spelling carefully before you save.
Choose Save Settings. Wait for the page to finish saving, then check that Company Name still shows your saved value. This confirmation is important. If the form reports an error, correct the highlighted field before continuing.
Next, complete Company Information and Localization using the related setup guides. Use the dedicated logo tutorial for visual branding. The matching written guide and related Pixie CRM videos are linked in this video's description.
Open Settings from the Pixie CRM dashboard, then choose Company Information. These settings control the organisation details used in document layouts. They are separate from the company name shown in General settings.
Enter the company name you want to use on business documents. Use your organisation's correct details. Our example uses Willowbrook Consulting, a fictional training company, so the records shown here do not represent a real business transaction.
Complete the address, city, state or county, and postal code. Follow each field label on your screen. Check these details carefully, because they can appear in the company information section of generated documents.
Review Country Code and Phone. We are using G B and a reserved example number. Complete VAT Number with the relevant company details when needed; we leave it blank for this training example. Keep the information format unchanged unless you intend to customise the document layout.
Choose Save Settings and wait for the page to reload. Check that the company details are still present. The saved settings are ready to be used by document templates that include these company information fields.
Continue with the localisation, logo and invoice setup tutorials for the next steps. Use the matching written guide linked in this video's description. Available settings and document layouts depend on your permissions and enabled modules.
Open Settings from your Pixie CRM dashboard, then choose Localisation. Here you can choose your workspace date format, time display, default time zone and language settings. This example uses the dedicated training workspace.
Open Date Format and select the format your team uses. We will choose day, month and year with slashes. Check the displayed example rather than assuming that the order of numbers is the same in every workspace.
Choose the time display, then set the default time zone for your organisation. Our example uses twenty four hours and Europe slash London. Select the correct time zone for your own team before continuing.
Review Default Language and the available language options. Our training workspace uses English. The enabled languages and language switch settings control which choices are available. Leave these controls unchanged unless you intend to change your team's language options.
Choose Save Settings and wait for the page to reload. Confirm the saved date format, time display, time zone and default language. These organisation defaults are separate from any personal preferences your account or other enabled modules may provide.
Use the company information, personal profile and team access tutorials for the next setup steps. The matching written guide is linked in this video's description. Only authorised administrators should change organisation settings.
From your Pixie CRM dashboard, open Setup, choose Finance and then Currencies. This list shows the configured currencies and identifies the current base currency. Our fictional training workspace has no invoices or payments.
Choose New Currency. Enter the currency code G B P and the pound symbol. Use the correct code and symbol for the currency you need. Adding a currency is separate from making it the workspace's base currency.
Review the decimal and thousand separators. We are keeping a decimal point and a comma for thousands, with the symbol before the amount. Check these formatting choices before saving the currency.
Choose Save and wait for the list to update. Confirm that G B P and the pound symbol appear in the new row. The currency is now configured and available for the workflows that use this currency list.
For this empty training workspace, choose Make base currency on the G B P row. Confirm that its Base Currency label appears. Review existing records before changing this setting in your own workspace; the system can prevent a change when currency-linked transactions already exist.
Continue with the matching company, customer and finance guides linked in the description. This walkthrough configures the training workspace's currency. It does not perform a currency conversion, create a financial document or move any money.
Open Customers in Pixie CRM, then choose New Customer. A customer record holds the organisation's details. Individual people and their access are managed as contacts, which we cover in the related contact tutorial.
Enter the customer company and phone number. Company is required on this form. Our example is Maplebridge Design, a fictional training organisation, with a reserved example phone number. Leave opening balances and VAT blank when they do not apply to your example.
Review Currency and Default Language. System Default uses the workspace defaults. We will leave the currency on System Default and choose English for this customer's language. Select the correct choices for your own customer and organisation.
Enter the customer address, city, state or county, and postal code. Then choose the country. We are using fictional training details. Billing and shipping addresses have a separate tab, so they can be completed independently when the customer needs different document or delivery addresses.
Choose Save to create the customer record without adding a contact in this step. Wait for the customer page to load, then check the saved company, phone, language and address. The customer record is now ready for contacts and your next authorised workflow.
Continue with the contact and billing address tutorials to build out the record. Creating a customer alone does not demonstrate a customer login or send a contact invitation. The matching written guide and related tutorials are linked in this video's description.
Open the customer's record in Pixie CRM, then choose Billing and Shipping. These fields are separate from the main customer address. Our example continues with Maplebridge Design, the fictional training customer created in the related tutorial.
Choose Same as Customer Info to copy the customer's main address into Billing Address. Check the street, city, state or county, postal code and country. Edit any field that needs a different billing address before saving.
Choose Copy Billing Address when the shipping address should match. If delivery goes to a different location, enter that address instead. Check both sets of details carefully rather than assuming that billing and shipping always match.
Choose Save, then reopen Billing and Shipping after the page reloads. Check that both sets of address fields were retained. The customer record now holds the separate billing and shipping information for workflows that use those fields.
Use the customer record and contact tutorials for the next steps. The matching written guide is linked in this video's description. The details shown here are fictional training data, and no invoice or delivery is sent during this walkthrough.
Open the customer record in Pixie CRM and choose Notes. Select New Note to open the note description field. This example uses Maplebridge Design, a fictional training customer.
Enter a concise, factual note. We are recording a training reminder to review the design scope before preparing a proposal. Check your wording and the customer record before saving, and follow your organisation's rules for confidential information.
Choose Save and wait for the notes list to update. Confirm that the description appears under the intended customer. Review the Added From and Date Added columns to see the note's recorded author and date.
Use the related customer, billing and permission guides for the next steps. This tutorial adds a note to the customer record. The matching written instructions and other Pixie CRM videos are linked in the description.
Open Leads in Pixie CRM, then choose New Lead. The Status field identifies the lead's stage in your process. This example demonstrates adding a status without creating or contacting a lead.
Choose the plus sign beside Status. Enter a clear name that your team understands. We will use Qualified Enquiry for this training workspace. Avoid creating duplicate statuses with slightly different names.
Choose the tick icon beside the new status name to save it. Open the Status list and select Qualified Enquiry. The new option is now available in the lead form; the rest of the lead remains unsaved in this demonstration.
Close the empty lead form, reopen New Lead and select the saved status again. This confirms that Qualified Enquiry remains available for future leads. Continue with lead sources and the dedicated create a lead tutorial for the next steps.
Open Leads in Pixie CRM, then choose New Lead. Source records where an enquiry came from. This tutorial adds a source in the training workspace without creating or contacting a lead.
Choose the plus sign beside Source. Enter a name that describes the enquiry channel, such as Website Enquiry. Use a consistent naming approach so your team can select the right source and review lead activity clearly.
Choose the tick icon to save the new source. Open the Source list and select Website Enquiry. Saving the source adds a configuration option; it does not save this otherwise empty lead form.
Close the empty form, reopen New Lead and select the saved source again. Website Enquiry is now available for future leads. Continue with the dedicated lead-creation tutorial to see how status, source and owner work together on a saved enquiry.
Open Leads in Pixie CRM, then choose New Lead. A lead records an enquiry before it becomes a customer. This demonstration creates a fictional enquiry in the training workspace, using the status and source configured in the earlier tutorials.
Choose New Enquiry as the status and Website Enquiry as the source. Confirm Alex Morgan as the assigned owner. Status describes the current stage, source records the enquiry channel and the assigned owner is the team member responsible for this lead.
Enter Oliver Hughes, the position Operations Manager and the demonstration email and phone number. Use accurate details and your organisation's handling rules when creating real enquiries. The contact details shown here are reserved fictional examples.
Add Cedarhouse Advisory, marked as a training company. In Description, record a short factual summary of the enquiry. Clear context helps the owner understand what the prospect needs without having to reconstruct the first conversation.
Review the visibility and contact-history choices before saving. Public remains off. Clear Contacted Today because this fictional enquiry has not been contacted. Do not record a contact event that has not happened. Check the selected status, source and owner once more.
Choose Save and wait for the saved lead profile. Close the profile to return to the list, then confirm Oliver Hughes appears with the selected stage and source. The enquiry is now recorded for the next follow-up workflow. This tutorial does not contact the prospect or convert the lead into a customer.
Open Settings in Pixie CRM, then choose General. The company logo identifies your organisation in the workspace and supported documents. This training workspace uses the official Pixie logo as the demonstration image.
Under Company Logo, choose the prepared image from your computer. Check that you own or have permission to use the logo. Confirm the selected filename before saving. The dark-logo and favicon fields are separate choices.
Choose Save Settings. Wait for the page to return and confirm the logo appears in the workspace header and the settings preview. This confirms the image was uploaded and saved for this training workspace.
Review the image at its displayed size. Continue with company information, localisation and document settings using the linked guides. Uploading a company logo changes the workspace's company branding; it does not change the branding of a connected external service.
Open Leads in Pixie CRM and choose the Kanban view icon. The pipeline groups lead cards by their saved status, giving your team a visual way to review the current stage of each enquiry.
Review the configured columns. In this training workspace, New Enquiry contains our fictional enquiries and Qualified Enquiry is empty. Your own stages depend on the lead statuses configured for your business. A lead's stage should reflect its actual progress.
Open Oliver Hughes to review the saved lead record. Check the company, enquiry source and current information before changing its stage. Close the profile to return to the board. This is a fictional training example and no prospect is contacted.
Drag Oliver's card from New Enquiry into Qualified Enquiry. Drop it in the destination column and wait for the card to appear there. This demonstrates a status change on the board; it does not convert the lead into a customer.
Confirm Oliver Hughes appears under Qualified Enquiry. The board saves this change automatically, so there is no separate Save button for this move. Use the appropriate stage for the work your team has actually completed.
Return to list view and confirm the saved row shows Oliver Hughes with Qualified Enquiry as the status and Website Enquiry as the source. List and Kanban views show the same underlying lead records. Continue with the linked guides for ownership, follow-up and lead conversion.
From Sales and Finance, open Sales, then Deals and pipeline. The sales workspace brings opportunities, forecasts, reporting, relationships and reusable sales actions together. The empty pipeline here belongs to the training workspace.
Choose Forecast and targets to review the forecasting workspace, then Reports for the available sales analysis. Use these views with your recorded opportunity data and agreed reporting periods.
Choose Relationships to explore the customer and contact context around opportunities. Sales actions contains reusable routines. Review the proposed changes and reminders before applying a routine to actual deals.
Import and export handles opportunity data transfer. Products and pricing supports product selection and quotations, while Sales setup contains pipeline configuration. These are separate workspaces, so open the relevant tab for the job you need.
From the Sales menu, choose Proposals. Use this area to prepare and manage proposals before moving an agreed opportunity into the next commercial stage. Open the dedicated proposal guide for the full creation and review workflow.
Choose Estimates to work with customer estimates. Keep the customer, line items, currency and acceptance terms consistent with the work being offered. This overview locates the workspace; the dedicated guide covers its saved document workflow.
Choose Invoices to review paid, outstanding, overdue and draft invoice queues. Create New Invoice starts a new invoice, while recurring invoices and batch payments have their own controls. The training workspace has no real customer billing.
Payments provides the recorded payment list. Credit Notes handles credit documents separately from invoice creation. Use the dedicated finance guides to follow the correct record, review and allocation steps for your organisation.
Choose Items for reusable products and services used in sales documents. Consistent item descriptions, rates and tax choices help the team prepare documents with less repeated entry. Review each document before it is issued.
Sales and Finance also contains Subscriptions, Expenses and Contracts. Each has its own record list and workflow. Subscriptions can require a connected payment provider; completing a real subscription or agreement requires the appropriate private setup and review.
Open Accounting, then Dashboard for the accounting view. Banking, transactions, registers, bills, journal entries, transfers and reconciliation are available from the same menu. Choose the area that matches the accounting work you need to review.
The Chart of Accounts provides the accounting structure. Budget contains budget planning, and Reports contains the available accounting reports. A live organisation should configure these with its own accounting policies before recording real transactions.
Open Projects in Pixie CRM and choose New Project. Enter Website Refresh, marked as a training project. A project connects customer work, dates, members and delivery activity in one record.
Open Customer and begin typing Maplebridge Design. Select the saved training customer from the results. Check this choice carefully because the project will belong to that customer and can appear in its connected records.
Choose Fixed Rate as the billing type and Not Started as the status. Enter zero as the cost for this fictional training project. These project settings do not issue an invoice, request payment or charge the customer.
Enter the start date and deadline using the configured day, month and year format. The example runs from the fourth to the eighteenth of November. Confirm Alex Morgan is included in Members and keep progress calculated through tasks.
Use Description to record a clear outline of the work. This example covers reviewing the website brief, preparing a design proposal and agreeing the delivery steps. Keep the project scope factual and separate from any final contract or approval.
Review the notification choices before saving. Keep Send project created email off, then open Project Settings and choose Do not send notifications for this training example. Review your organisation's intended customer notifications and project access settings before creating a real project.
Choose Save. Confirm that the project overview opens with the correct project name and customer. The saved project is ready for its tasks and milestones. Continue with the dedicated guides for project members, permissions, tasks and progress tracking.
Open Tasks in Pixie CRM and choose New Task. Enter Review website brief, marked as a training task. A clear subject describes the action the owner needs to complete.
Under Related To, choose Project. Search for Website Refresh and select the saved training project for Maplebridge Design. This links the task to the project so its delivery work can be followed in context.
Set the start date to the fourth of November and the due date to the sixth. Choose High priority for this example. Use the configured day, month and year format and select a priority that reflects the real urgency of the work.
Confirm Alex Morgan as the assignee. Keep Public and Visible to customer off, and clear Billable for this internal training task. Check who should see a real task and whether its time should be billable before saving it.
Open Description and enter the steps the owner should follow. This example asks the owner to review the fictional brief, list any missing requirements and prepare questions for the next project discussion. Clear instructions make the expected result easier to check.
Choose Save and confirm the saved task name and linked project. Review the assigned owner, priority and dates in the saved task. The work is now recorded for follow-up. Continue with the dedicated task-management and project-progress guides for the next steps.
Open the saved Website Refresh project in Pixie CRM. Choose Milestones, then New Milestone. A milestone marks an important stage of the project and gives related tasks a clear delivery context.
Enter Discovery and brief review, marked as a training milestone. Set the start date to the fourth of November and the due date to the seventh. Use dates that fit the project schedule and describe a specific stage of the work.
Use Description to explain the expected result. This example covers completing the fictional brief review and listing the next steps. Keep the description clear enough for the team to recognise when the stage has been completed.
Review the customer visibility choices. For this internal training milestone, keep Show description to customer off and select Hide from customer. Leave Order at one. Choose visibility and ordering appropriate to the project before saving.
Choose Save and confirm Discovery and brief review appears in the project's milestone view. The milestone is now recorded for the project. Continue with the dedicated task and milestone guides to organise the work that belongs to this stage.
Open the Website Refresh training project and choose Milestones. The board groups project tasks by delivery stage, with an Uncategorized column for tasks that have not yet been assigned to a milestone.
Find Review website brief in Uncategorized. Beside it is the Discovery and brief review milestone, with its own date range. Check the task and the destination before moving anything, particularly when a project has several stages.
Drag the task card into Discovery and brief review, then release it. The task now appears beneath that milestone. This organises the existing task; it does not create a duplicate or mark the work as completed.
Choose Overview, then reopen Milestones to check the saved result. Review website brief remains under Discovery and brief review, while its status is still Not Started. Use the dedicated task guides to update progress when the actual work takes place.
Open Clients and CRM, then Appointments. The summary shows appointment totals and statuses, with a separate review process for appointment requests. Review a request and the available time before confirming a booking.
Appointment Services defines the services available for booking. Company Schedule and Staff Working Hours provide the scheduling context. Keep these settings aligned with the team and service durations before offering appointments to clients.
Open Pixie CRM WhatsApp and choose Inbox. Conversations, CRM activity and conversation controls are brought into the same workspace. This training connection is awaiting private setup, so no message delivery or completed WhatsApp connection is represented.
Standard Replies provides reusable message wording. Audit Trail records the module activity available to your account. Review recipients and message content carefully before sending any real communication. Connection setup and QR scanning should be completed privately.
Open MailboxAI from Support. With no mailbox connected, the application directs this training workspace to Mailbox Accounts. Add Account begins provider setup. Complete sign-in, consent and any credentials privately, then return to the inbox after the connection is ready.
MailboxAI also contains Email Templates, Auto Replies, Categories, Drafts and Scheduled messages. Open Email Templates for reusable email content, then Scheduled to review the scheduled queue. Sending and provider delivery are separate from preparing a draft.
Open Pixie CRM Google Workspace. The integration presents Google Meet, Calendar, Gmail, Drive and related collaboration tools. Access depends on configured provider integration and user consent. This training account is not connected; authentication should be completed privately.
Open Pixie CRM Calling to review provisioned identities, extension readiness and registration status. Browser calling also needs the authorised microphone permission and a ready calling service. This overview does not place a real call or grant microphone access.
Open Support Tickets to review ticket status queues, assignment context and the weekly overview. New Ticket starts a support case, while the Ticket Compliance Pack has a separate evidence workflow. Use a clear subject and the correct customer context when recording a real issue.
Open Letter Manager from Tools. The dashboard supports selecting a CRM recipient or using a separate manual recipient workflow. Templates and the Compliance Pack are separate sections. Review the recipient, document and delivery choices before sending a real letter.
Open Templates for reusable letter content. The Compliance Pack provides the available evidence records and controls. A saved template, a prepared letter and a delivered letter are different stages; use the dedicated guides to follow the complete workflow.
Choose Delivery Note to review delivery-note records and their reference, invoice, recipient, delivery date and status. The training list is empty. Use the related document workflow when a real delivery needs to be recorded.
Open QR Compliance Records to find document QR records, signature status and scan evidence. Review the recorded evidence and verification state for the specific document. An empty list does not represent a completed signature or verified delivery.
Open Knowledge Base to manage articles and their groups. New Article starts an article, while the list shows its group and publication date. Use clear article titles and review the intended audience before publishing guidance.
Open Calendar under Utilities. The monthly view brings scheduled work into context, including the fictional task and project dates already recorded in this walkthrough. Month, Week and Day provide different planning views.
Open Task Filters for a more focused view of work by staff member, status, billing and related record. Saved filter templates can help repeat a useful review. Choose filters that answer a specific operational question.
Lead Filters provides a focused view by owner, stage, source and other recorded lead information. Use it to identify enquiries requiring attention and keep the follow-up view consistent with the current lead data.
Open Sales under Reports for invoice, item, payment, proposal, estimate and customer reporting. Expenses versus Income provides a separate financial comparison. Reports reflect recorded data and the selected filters, so check the reporting period and currency context.
Open the Xero integration dashboard. Its navigation includes invoice sync, reconciliation, bank activity, document intake, mappings, exceptions and compliance evidence. This workspace shows Not Configured. Complete the provider connection privately before expecting data synchronisation.
The QuickBooks integration has its own dashboard and corresponding synchronisation, reconciliation, document and evidence tools. Review connection readiness and exceptions for the correct provider. This training workspace does not claim a completed connection or successful external transfer.
Open Sage Accounting to locate its provider-specific synchronisation and reconciliation workspace. The dashboard keeps connection status and queued work visible. Follow the dedicated integration guide and complete account authorisation privately before using it with real accounting records.
Open Pixie CRM Automations to review the available Zapier capabilities and workspace-specific connection information. Read the requested capabilities before authorising an external automation. This overview only locates the controls and does not grant a connection new access.
Setup contains Staff and Roles for team administration. Review the intended person, role and required access before making changes in a live workspace. This overview shows where the controls are; the training recording does not add a user or change permissions.
Custom Fields extends the information captured against supported records. GDPR provides privacy-related controls. Configure these for your actual organisational process and review the consequences of any data or retention action before applying it.
Solution Catalogue lists configurable capabilities and integration options. Catalogue entries are options to explore or request; they are not a claim that every listed solution is installed in this trial. Use the configured workspace menus and the relevant guide to understand current availability.
Choose the Pixie logo to return to the dashboard. You have followed the setup, customer, lead, project and task workflows, and located the wider business tools. Continue with the dedicated feature videos for detailed saved-result instructions, using the same matching help pages.
Follow the written instructions
Open the matching written guide ↗ · Browse all Pixie CRM video guides